Easy Beginner Sourdough Bread Recipe (Step-by-Step Guide)
Baking sourdough bread might seem intimidating, but it doesn’t have to be! This beginner-friendly sourdough recipe is designed for beginners, breaking down the process into simple steps to bake a beautiful loaf confidently. Whether you’re new to sourdough or looking for a reliable, beginner-friendly sourdough recipe, this guide will walk you through everything you need to know.
Why should you make this sourdough recipe?
When I first started baking sourdough, I felt overwhelmed by the number of recipes and techniques available. It seemed complicated, and I wasn’t sure I’d ever get it right. But I originally started making sourdough for the gut health benefits and because I loved the idea of using just a few simple, natural ingredients—no preservatives or additives like store-bought bread.
Once I started using these measurements, everything changed. My loaves turned out amazing, and best of all—it was easy. Since I started this beginner-friendly sourdough recipe, I haven’t had a single bad loaf!
I created this recipe to take the stress out of sourdough baking. If you’re feeling unsure or intimidated, this guide will help you simplify the process and actually enjoy the experience of baking fresh sourdough at home.
What is Sourdough Bread, and Why is it Different?
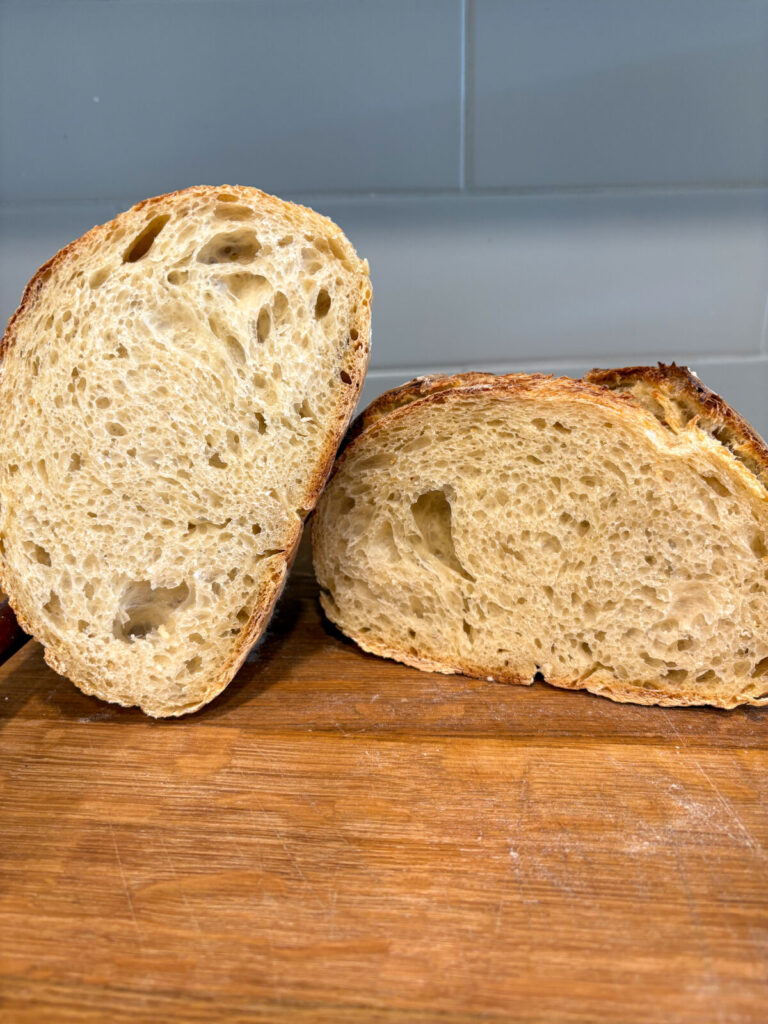
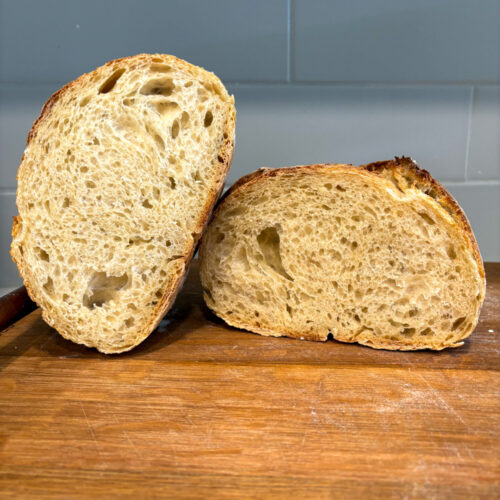
Sourdough bread is made with just flour, water, salt, and a sourdough starter—no commercial yeast, no preservatives, just simple ingredients. The fermentation process makes it special, which gives it that amazing flavour and makes it easier to digest.
I first got into sourdough because of the gut health benefits and the fact that it’s made with ingredients you actually recognize. The long fermentation helps break down gluten and phytic acid, making it gentler on digestion compared to regular bread. Plus, the slow process creates that signature tangy flavour and perfect crust. This beginner-friendly sourdough recipe keeps things simple and effective.
Common Sourdough Mistakes (And How to Fix Them!)
If you’re new to sourdough, don’t worry—mistakes happen! Here are a few common struggles and how to fix them:
Bread too dense or gummy? Your dough might need a longer rise time. Let it ferment until it’s puffy on the top and there are bubbles on the side of the bowl
Does the loaf come out flat? It might be over-proofed. Try shortening the final rise next time.
Is your dough too sticky during stretch and folds? Try wetting your hands before doing stretch and folds.
Is the crust too Crispy? After your loaf is baked, let it cool in your Dutch oven with the lid off for 30 minutes and then for 30 minutes with the lid on.
How to Store and Keep Your Sourdough Bread Fresh
For 1-2 days: Keep your loaf in the Dutch oven with the lid on or on the counter in a bread box.
For longer storage, You can freeze the loaf whole or in slices in ziplock bags.
Original Sourdough Recipe
Equipment
- Large glass or ceramic mixing bowl
- Kitchen scale
- Kitchen towel or plastic wrap
- Dough whisk or wooden spoon
- Bench scraper
- Medium-sized bowl or banneton
- Parchment paper
- Scoring tool or knife
- Dutch oven
- Cookie sheet
- Bread Knife
Ingredients
- 125 grams of active sourdough starter
- 325 grams of room temperature filtered water
- 500 grams of bread flour or all-purpose unbleached flour
- 10 grams of salt
Instructions
Feed your Starter
- Before you begin, you will need to feed your sourdough starter.
- I recommend feeding your starter 4-8 hours before you plan to prep your dough.
- I usually feed my starter a 1:2:2 ratio. I start with 50 grams of starter in my jar and feed it 100 grams of flour and 100 grams of water.
Step 1: Mixing your Dough
- In a large bowl, combine the sourdough starter and water. Stir until the starter is dissolved.
- You will be left with a milky consistency.
- Add the flour and salt. Mix until you are left with no flour pockets.
- *Tip* I like to use my dough whisk to mix the dough, and then I use my hands to make sure everything is fully incorporated
- Cover the bowl with a kitchen towel or plastic wrap and let it rest for 1 hour.
Step 2: Stretch and Folds
- Perform 3-4 sets of stretch and folds every 30 minutes. Keep the dough covered between sets.
- To stretch and fold, lift one side of the dough, stretch it upwards, and fold it over the center. Repeat on all sides.
Step 3: Bulk Fermentation
- After completing the stretch and folds, cover the bowl and leave it at room temperature until bubbles form and the dough rises (3-12 hours, depending on the temperature).
- This will be trial and error. Your bulk fermentation time is dependent on your climate and the temperature of your house.
Step 4: Shaping the Loaf
- Flour your countertop and transfer the dough onto it. Your dough may need help, so you can gently guide it using your hands or a rubber bench scraper.Shape the dough by flattening it out into a rectangle. This is called laminating (careful not to tear the dough)Fold one side of the rectangle into the middle of the dough. Fold the other side of the rectangle on top of the side you just placed down.Gently roll the dough up from one end to the other.Then, you will do push and pulls. Gently push the dough ball away from youand then pull it back towards you. This will create tension on the top of the dough. If you need help with this step, I have a tutorial on my TikTok page (therapybysourdough)Place the dough in a floured banneton or towel-lined bowl, seam side up, and cover it. Let it sit at room temperature for 30 minutes to an hour, then refrigerate for 4-24 hours. (the longer it sits in the fridge, the more sour flavour your loaf will have, it also makes it easier to digest)*Tip* I like to cover my dough with a damp towel so that the dough does not dry out in the fridge.
Step 5: Score + Bake
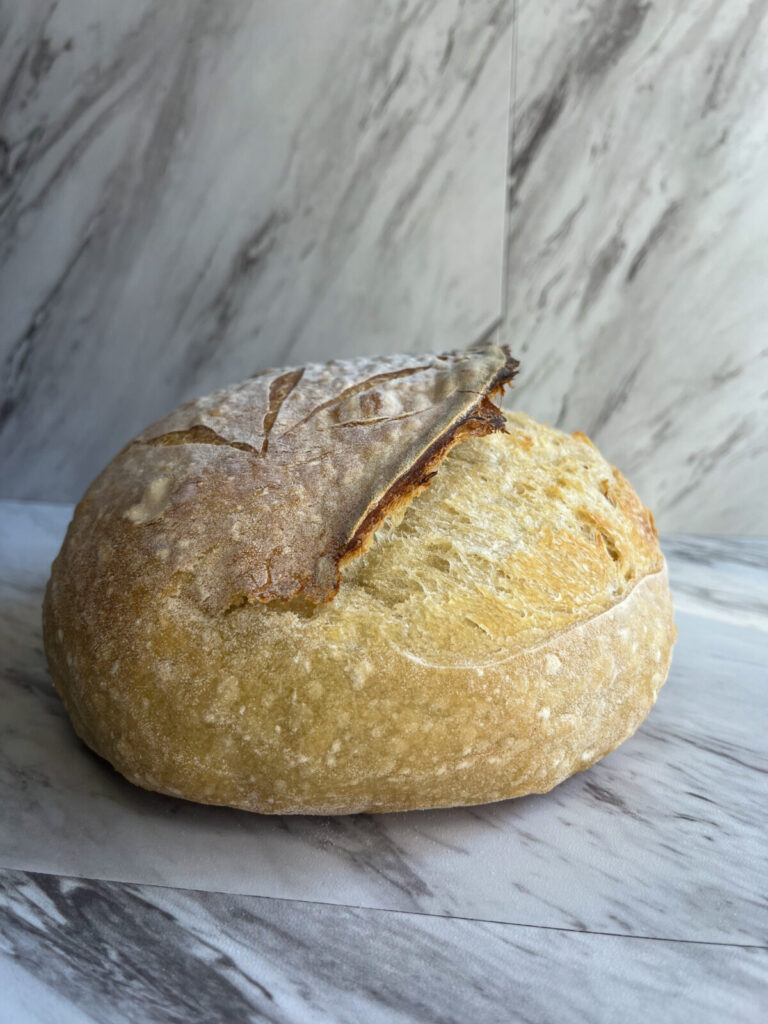
- Preheat the oven to 450°F (230°C) with the Dutch oven inside for 30 minutes.Gently flip your dough onto parchment paper. The seam side will be sitting on the parchment paper.To flour the top of the loaf, use Thai rice flour or the flour you used to make the dough.Use a scoring tool or a knife to make a large cut along the side of the dough. This allows the gases to escape while it bakes. If you miss this step, your loaf could explode!You can add pretty designs if you would like. Pinterest has excellent inspiration pictures!Transfer it to the preheated Dutch oven.Bake covered for 30 minutes, then remove the lid and bake for another 15 minutes.*Tip* place a cookie sheet on the rack below your Dutch oven while your loaf bakes to prevent the bottom from burning
Step 6: Cool off and enjoy! Congratulations on your gorgeous loaf!
- Take your dough out of the oven and let it cool for at least an hour before cutting into it (if you don't wait your bread may end up being gummy)Enjoy!!!
Don’t have a sourdough starter? No Problem! Check out my beginner-friendly sourdough starter guide.
Having trouble with your sourdough starter? Here are some ways to troubleshoot to get a super strong sourdough starter!
Need to stock up on sourdough essentials? Check out my sourdough must haves!
The only sourdough recipe I follow. Every time I try a new one it never turns out just right! Super easy recipe written for the beginner baker so anyone can follow! I’ve shared with friends and they love as well 🙂
Loved this sourdough recipe! The instructions were clear and easy to follow, even for someone still learning the process. I appreciated the detailed timing and tips on stretching and folding. The final loaf had a gorgeous crust and a tender, airy crumb with that perfect sourdough tang. Letting it cold proof overnight really brought out the flavour. This is a great base recipe I’ll keep coming back to.
The best recipe hands down!! She makes it wayyyy easier to understand how to make a perfect sourdough loaf!