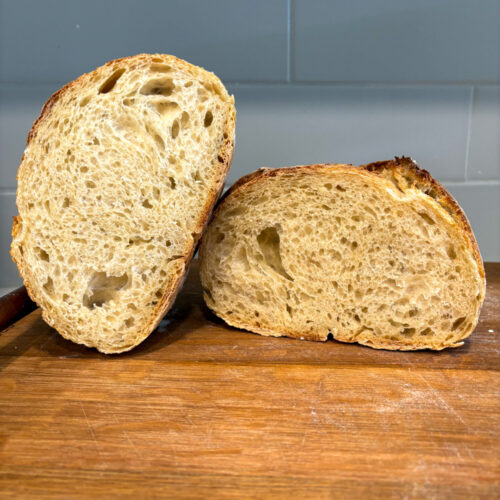
Original Sourdough Recipe
This easy sourdough bread recipe is perfect for beginners and makes the baking process uncomplicated and fun! With simple ingredients and clear step-by-step instructions, you'll learn how to create a delicious, crusty loaf with a classic tangy flavor. There are no complicated techniques here, just a straightforward method designed to build your confidence and enjoyment in baking with sourdough.
Equipment
- Large glass or ceramic mixing bowl
- Kitchen scale
- Kitchen towel or plastic wrap
- Dough whisk or wooden spoon
- Bench scraper
- Medium-sized bowl or banneton
- Parchment paper
- Scoring tool or knife
- Dutch oven
- Cookie sheet
- Bread Knife
Ingredients
- 125 grams of active sourdough starter
- 325 grams of room temperature filtered water
- 500 grams of bread flour or all-purpose unbleached flour
- 10 grams of salt
Instructions
Feed your Starter
- Before you begin, you will need to feed your sourdough starter.
- I recommend feeding your starter 4-8 hours before you plan to prep your dough.
- I usually feed my starter a 1:2:2 ratio. I start with 50 grams of starter in my jar and feed it 100 grams of flour and 100 grams of water.
Step 1: Mixing your Dough
- In a large bowl, combine the sourdough starter and water. Stir until the starter is dissolved.
- You will be left with a milky consistency.
- Add the flour and salt. Mix until you are left with no flour pockets.
- *Tip* I like to use my dough whisk to mix the dough, and then I use my hands to make sure everything is fully incorporated
- Cover the bowl with a kitchen towel or plastic wrap and let it rest for 1 hour.
Step 2: Stretch and Folds
- Perform 3-4 sets of stretch and folds every 30 minutes. Keep the dough covered between sets.
- To stretch and fold, lift one side of the dough, stretch it upwards, and fold it over the center. Repeat on all sides.
Step 3: Bulk Fermentation
- After completing the stretch and folds, cover the bowl and leave it at room temperature until bubbles form and the dough rises (3-12 hours, depending on the temperature).
- This will be trial and error. Your bulk fermentation time is dependent on your climate and the temperature of your house.
Step 4: Shaping the Loaf
- Flour your countertop and transfer the dough onto it. Your dough may need help, so you can gently guide it using your hands or a rubber bench scraper.Shape the dough by flattening it out into a rectangle. This is called laminating (careful not to tear the dough)Fold one side of the rectangle into the middle of the dough. Fold the other side of the rectangle on top of the side you just placed down.Gently roll the dough up from one end to the other.Then, you will do push and pulls. Gently push the dough ball away from youand then pull it back towards you. This will create tension on the top of the dough. If you need help with this step, I have a tutorial on my TikTok page (therapybysourdough)Place the dough in a floured banneton or towel-lined bowl, seam side up, and cover it. Let it sit at room temperature for 30 minutes to an hour, then refrigerate for 4-24 hours. (the longer it sits in the fridge, the more sour flavour your loaf will have, it also makes it easier to digest)*Tip* I like to cover my dough with a damp towel so that the dough does not dry out in the fridge.
Step 5: Score + Bake
- Preheat the oven to 450°F (230°C) with the Dutch oven inside for 30 minutes.Gently flip your dough onto parchment paper. The seam side will be sitting on the parchment paper.To flour the top of the loaf, use Thai rice flour or the flour you used to make the dough.Use a scoring tool or a knife to make a large cut along the side of the dough. This allows the gases to escape while it bakes. If you miss this step, your loaf could explode!You can add pretty designs if you would like. Pinterest has excellent inspiration pictures!Transfer it to the preheated Dutch oven.Bake covered for 30 minutes, then remove the lid and bake for another 15 minutes.*Tip* place a cookie sheet on the rack below your Dutch oven while your loaf bakes to prevent the bottom from burning
Step 6: Cool off and enjoy! Congratulations on your gorgeous loaf!
- Take your dough out of the oven and let it cool for at least an hour before cutting into it (if you don't wait your bread may end up being gummy)Enjoy!!!